
Hostess Cupcakes
This post may contain affiliate links. Please read disclosure policy.
These Homemade Hostess Cupcakes start with coconut oil, which does a particularly good job of evoking the flavor of the original. Combining Dutch cocoa with baking soda matches the inky darkness too, so no substitution for this! Make the filling a day in advance so you have time to bake and assemble the cupcakes with no stress. Your kid’s lunchboxes will love these! Who am I kidding, EVERYONE will love this childhood treat!

HOSTESS CUPCAKES RECIPE
I’m back with another nostalgic childhood treat—the Hostess Chocolate Cupcake. When most of us hear Hostess, we automatically think of the Twinkies, but did you know the chocolate cupcake with the white swirl started everything for Hostess? Yes, if you love those cream-filled chocolate cupcakes from the grocery store, you’ll love this Homemade Hostess Cupcake recipe even better! What’s not to love about a rich, decadent chocolate cupcake filled with marshmallow cream, then topped with a silky, smooth chocolate topping and the signature loop-de-loop of vanilla icing?


Hostess Chocolate Cupcakes

WHAT ARE HOSTESS CUPCAKES?
Hostess cupcakes are chocolate cakes with a creamy vanilla filling and swirled icing. The vanilla filling for the cupcake is the same one inside Twinkies and Sno Balls. The Hostess cupcake was first sold on May 10, 1919, and was the first commercially produced cupcake, originally produced by the Taggart Bakery as the Chocolate Cup Cake. Hostess, called the Continental Bakery at the time, purchased Taggart Bakery in 1925.
The man responsible for the cupcake with the seven-looped curlicue was DR ‘Doc’ Rice, a director for the cake division at Hostess. Rice was asked to improve on the quality of the cupcakes, which had suffered from WWII shortages. The new cupcake had an improved cake mix, purer chocolate icing, a vanilla filling (the original did not have a filling), and a straight white line of icing—which soon became a squiggle—allowing the company to sell them at a higher price.
To this day, the cupcake, yes, not the Twinkie continues to be the best-selling Hostess snack cake each year, with 600 million of them being consumed by Americans annually. Since then, the company has also introduced other flavors, which include Golden Cupcakes, Orange Cupcakes, Birthday Cupcakes, and Strawberry Cupcakes (previously limited edition).

INGREDIENTS IN HOSTESS CHOCOLATE CUPCAKE
The ingredients list for Hostess Chocolate Cupcake is pretty extensive, with some sketchy ingredients. This is from their package:
SUGAR, WATER, ENRICHED FLOUR (BLEACHED WHEAT FLOUR, MALTED BARLEY FLOUR, NIACIN, FERROUS SULFATE OR REDUCED IRON, THIAMINE MONONITRATE, RIBOFLAVIN, FOLIC ACID), HIGH FRUCTOSE CORN SYRUP, PALM OIL, CORN SYRUP, COCOA, SOYBEAN OIL, TALLOW, CONTAINS 2% OR LESS: GLYCERIN, COCOA PROCESSED WITH ALKALI, MODIFIED CORNSTARCH, BAKING SODA, SALT, CORN STARCH, DEXTROSE, WHEY, HYDROGENATED TALLOW, INULIN, EGG, CALCIUM CARBONATE, SORBIC ACID AND POTASSIUM SORBATE (TO RETAIN FRESHNESS), CALCIUM SULFATE, ENZYMES, EGG WHITE, MONO AND DIGLYCERIDES, SODIUM ACID PYROPHOSPHATE, COTTONSEED OIL, NATURAL AND ARTIFICIAL FLAVOR, SODIUM STEAROYL LACTYLATE, AGAR, XANTHAN GUM, SOY LECITHIN, POLYSORBATE 60, CELLULOSE GUM, LOCUST BEAN GUM, MONOCALCIUM PHOSPHATE, TITANIUM DIOXIDE (COLOR), DISODIUM PHOSPHATE, SUNFLOWER OIL, CHOCOLATE LIQUOR, DEFATTED SOY FLOUR.
This Homemade Hostess Cupcake does not contain half of the above, and better yet, you can pronounce all of them! You can also use the Homemade Cool Whip to make Twinkies.

Vintage picture of Hostess Cupcakes
CHOCOLATE CUPCAKES
flour
Dutch process cocoa powder
sugar
baking soda
kosher salt
low-fat buttermilk
egg
vanilla extract
coconut oil
CHOCOLATE TOPPING
heavy cream
dark chocolate
corn syrup
DECORATIVE ICING
powdered sugar
heavy cream
HOMEMADE COOL WHIP
unflavored gelatine
vanilla extract
light corn syrup
sugar
kosher salt
milk
powdered milk

Chopped chocolate to make the ganache topping
YOU MAY ALSO LIKE


HOW TO MAKE HOMEMADE HOSTESS CUPCAKES
FOR THE HOMEMADE COOL WHIP
1 1/2 teaspoons unflavored gelatin powder
2 tablespoons (1oz) cool water to bloom the gelatin
1 1/2 teaspoons vanilla extract and/or 1 vanilla bean
1/4 cup (2oz) water for sugar syrup
1/4 cup (2 3/4oz) light corn syrup
3/4 cup (5oz) sugar
1/4 plus 1/8 teaspoon Diamond Kosher salt (half as much if iodized)
1/4 cup (2oz) milk
3 tablespoons (3/4oz) powdered milk
1 1/2 cup (12oz) heavy cream
FOR THE CHOCOLATE CUPCAKES
1 1/3 cups (6oz) all-purpose flour, such as Gold Medal
1 1/3 cups (4oz) Dutch-process cocoa powder, such as Cacao Barry Extra Brute
1 1/4 cups (8.5oz) sugar
1 teaspoon baking soda
1/2 teaspoon Diamond Crystal kosher salt (half as much if iodized)
1 1/4 cups (10oz) cultured low-fat buttermilk
4 large eggs, straight from the fridge
1 tablespoon vanilla extract
1 1/2 cups (10.5oz) refined or virgin coconut oil, melted and still warm
FOR THE CHOCOLATE TOPPING
1/2 cup (4.5oz) heavy cream
1 cup (6.5oz) finely chopped dark chocolate, about 60%
1 tablespoon (1/2oz) corn syrup
1/2 recipe (2 cups or 12oz) Homemade Cool Whip (recipe follows)
FOR THE DECORATIVE ICING
1 cup (4oz) powdered sugar
2 tablespoons (1oz) heavy cream, or as needed


MAKE THE HOMEMADE COOL WHIP
Step 1: In a small bowl, mix the gelatin with 2 tablespoons (1oz) cool water and vanilla extract, if using. Or split the vanilla bean lengthwise with a paring knife, run the flat of the blade down each half to scrape out seeds, and add to the gelatin without stirring.

Mix the gelatin, water, and vanilla extract
Step 2: Combine remaining 1/4 cup (2oz) water, corn syrup, sugar, and salt in a 1-quart stainless steel pot over medium heat. Stir with a fork until the mixture is bubbling hard around the edges, about 3 minutes, then increase heat to medium-high. Clip on a digital thermometer and cook, without stirring, until the syrup registers 250°F, about 4 minutes.

Wait until the thermometer registers 250°F.
Do not walk away from this.
Step 3: Transfer thermometer to a large heat-safe bowl and pour in the hot syrup all at once, scraping the pot with a heat-resistant spatula. Cool to exactly 212°F, about 4 minutes. Do not walk away to ensure the right temperature is achieved.
Step 4: Add gelatin and, with a hand mixer, whip on medium-high until thick, snowy white, and roughly tripled in volume, about 10 minutes.

Whip with a hand beater until thick, and snowy white
Step 5: Whisk 1/4 cup (2oz) milk with 3 tablespoons (3/4oz) powdered milk in a small bowl. Add this to the marshmallow mixture, then transfer to a greased container, cover, and let stand at room temperature until stiff, about 2 hours.
Step 6: Transfer mixture to a bowl of a stand mixer fitted with a whisk attachment, along with 1 1/2 cup (12oz) of heavy cream. Mix on medium-low to roughly combine, then increase to medium-high and whip until thick, stiff, and creamy, about 5 minutes. Refrigerate up to 3 weeks in an airtight container or freeze for 2 months.

Transfer to a bowl of a stand mixer and continue to mix
MAKE THE CUPCAKES
Step 1: Adjust the oven rack to the middle position and preheat to 350°F.

Step 2: Sift the flour and cocoa together into a medium bowl (if using cup measures, spoon into the cups and level with a knife before sifting). Whisk in the sugar, baking soda, and salt, followed by the buttermilk, eggs, vanilla, and coconut oil, mixing until smooth. Divide the batter between two paper-lined cupcake pans, filling each cavity about two-thirds full (just shy of 2 ounces). I used an ice cream scooper for this.

Step 3: Bake until the cupcakes are domed and firm but still a touch steamy and soft at the very top, about 16 minutes. A toothpick inserted into the center of a cupcake will emerge with a few crumbs attached. Cool the cupcakes completely in their pans.


MAKE THE TOPPING
Step 1: Meanwhile, bring the cream to a simmer in a 2-quart stainless steel saucier over medium heat. Remove from the heat and whisk in the chocolate, followed by the corn syrup. Set aside until thick and warm, about 20 minutes (roughly 90°F); stir well before using.

Chocolate Ganache Topping
ASSEMBLE THE CUPCAKES
Step 1: Gently work a 1 1/8-inch round cookie cutter through the upper crust of a cupcake (leave the cupcakes in the pans), pushing through to the center but stopping short of the bottom. Angle the cutter slightly as you pull it out, leveraging it to "grab" the core of cake inside. Plunge the cake core onto a plate (you'll need it later), and repeat with the remaining cupcakes.
Core the cupcakes for the filling
Step 2: With the handle of a wooden spoon, roughly compress the cake layer at the bottom of each cavity to make room for more filling.

Step 3: Transfer Homemade Cool Whip to a piping bag fitted with a 1/4 -inch round tip and fill each cupcake, stopping just shy of the top. Tear the crust layer off each cupcake core and use them to plug the holes. Dollop a shy tablespoon (3/8 oz) of the topping over each cupcake, smoothing it into an even layer with the back of a spoon. Refrigerate until firm, about 20 minutes.
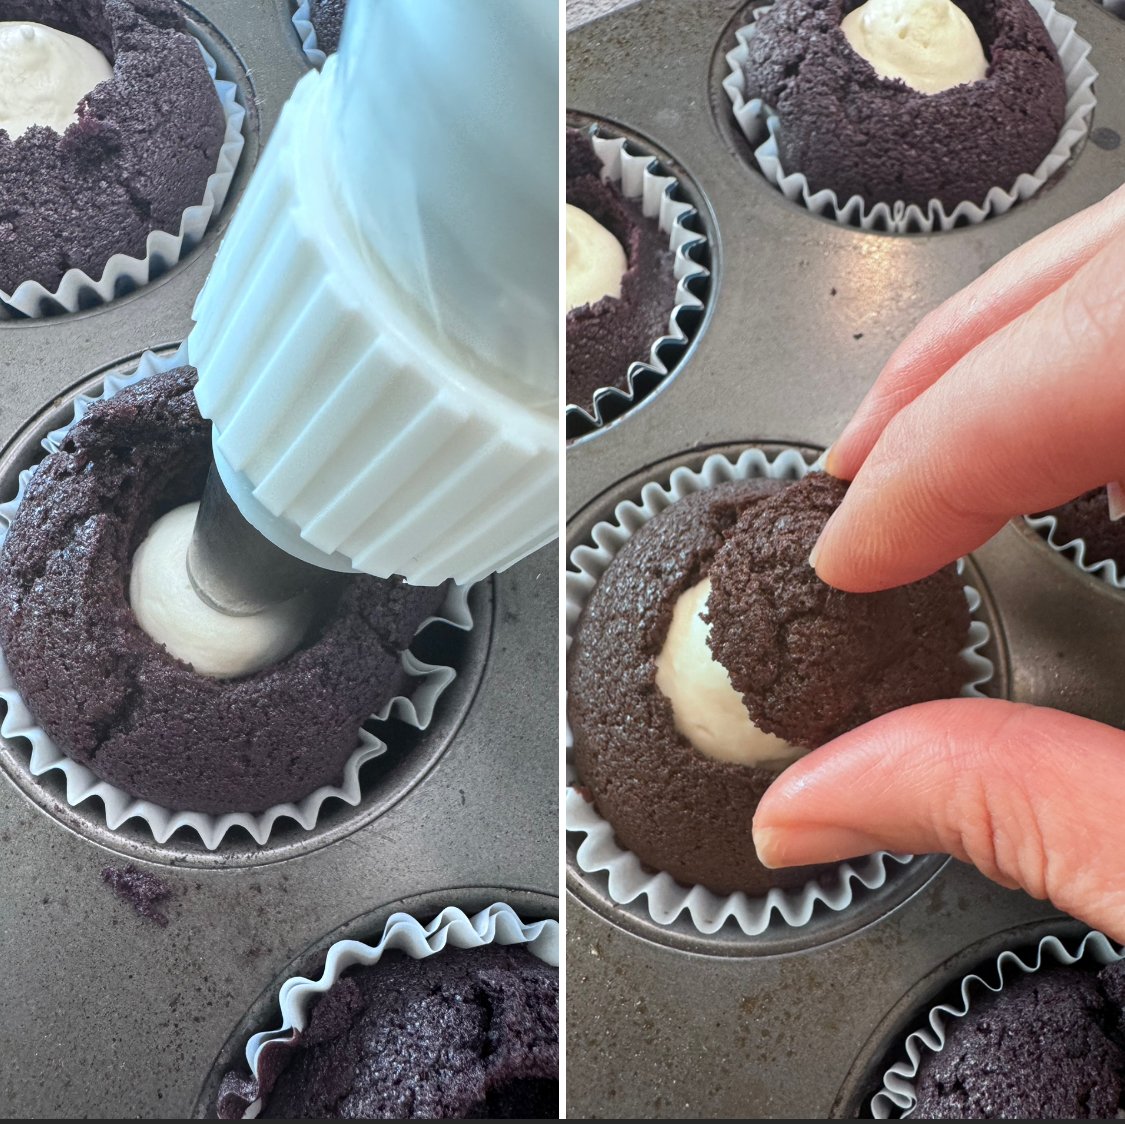
Add the filling and top off with the crust

Add the ganache. Use the back of a spoon to evenly spread

FINISH THE CUPCAKES
Step 1: Sift powdered sugar into a medium bowl. Stir in cream with a flexible spatula, scraping and stirring until perfectly smooth but stiff, like peanut butter. If too stiff to pipe, add a few drops of additional cream, but take care not to overdo it, or the icing will lose its shape after piping. This recipe makes more than strictly needed, to allow for some practice piping.
Step 2: Make a parchment cone by folding two 15-inch squares of parchment in half on the diagonal, then cut along the crease to make 4 triangles. Form the cone with one triangle by curling the short side toward the center, wrapping the long side around, and sliding the paper until it rolls tight. Tuck the remaining parchment “tail” into the cone, folding to secure it. Repeat with the remaining parchment, and stand each cone unright in a small drinking glass to fill. Watch this video if you need a visual.
Pipe the icing on the cupcakes
Step 3: Snip 1/8 inch from the tip of one cone, and gently squeeze over a sheet of foil until the icing hangs down like a piece of string. Practice making a loop-de-loop on the foil. Once you've gotten the hang of it, move on to the cupcakes. Set aside at room temperature until the icing dries, about 10 minutes. Store leftovers in an airtight container for up to 2 days at room temperature or for up to a week in the fridge. Let refrigerated cupcakes stand at room temperature for 3 hours before serving.

NOTES AND TIPS
for best results on the icing, use the parchment cone instead of a piping bag as the piping bag will bust when you squeeze the icing onto the cupcakes
Recipe courtesy of Bravetart.


Homemade Hostess Cupcakes
Ingredients
Instructions


Nutrition Facts
Calories
400.25Fat
26.35 gSat. Fat
18.79 gCarbs
41.62 gFiber
2.8 gNet carbs
38.79 gSugar
31.29 gProtein
4.74 gSodium
130.13 mgCholesterol
56.32 mg